In the ever-evolving realm of digital art, Blender emerges as a formidable force, empowering artists to conjure mesmerizing 3D worlds. However, even amidst the creative fervor, a peculiar ailment can mar the beauty of our creations – the enigmatic “zero faces” phenomenon. Fear not, intrepid Blender explorers, for in this comprehensive guide, we embark on a quest to vanquish this digital demon, forever ridding ourselves of its frustrating clutches.
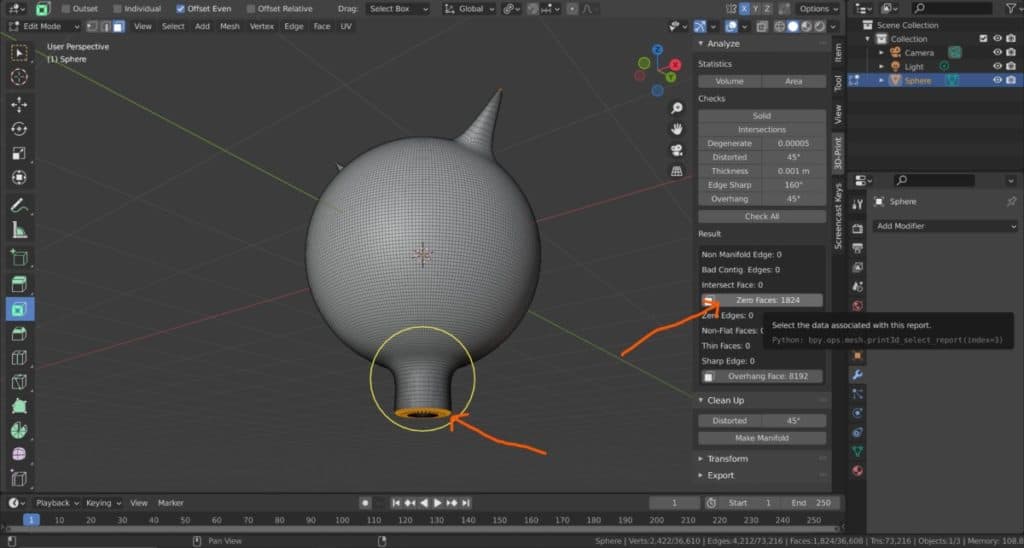
Image: blenderbasecamp.com
Delving into the heart of the matter, “zero faces” transpires when Blender encounters a mesh devoid of any discernible polygons, rendering the object invisible. This geometrical anomaly stems from various missteps, ranging from improper modeling techniques to unforeseen software glitches. Regardless of its origins, the impact can be devastating, leaving our carefully crafted objects as ethereal phantoms in the digital realm.
To confront this challenge head-on, we arm ourselves with a diverse arsenal of tactics. Let us commence with the quintessential method, ensuring our mesh possesses the requisite faces. Simply navigate to the “Edit Mode,” select the problematic object, and proceed to manually add faces by bridging vertices. Precision and meticulousness are paramount, as each stroke of our digital brush shapes the destiny of our virtual masterpiece.
Should this direct approach prove unfruitful, we shift our focus to scrutinizing the mesh’s topology. Oftentimes, zero faces arise from non-manifold geometry, a situation where one vertex connects to more than two edges. Employing Blender’s robust mesh analysis tools, we relentlessly hunt down these topological anomalies and rectify them. With each correction, we chip away at the stronghold of zero faces, paving the way for a topologically sound mesh.
Now, let us explore the realm of modifiers, essential tools in Blender’s digital forge. It is often within the Modifier tab that we discover the hidden cause of our woes. Misconfigured modifiers can wreak havoc upon our meshes, inadvertently inducing the dreaded zero faces. A thorough inspection and judicious adjustment of these modifiers often yield remarkable results, restoring our objects to their intended glory.
Furthermore, the power of Blender’s sculpting tools cannot be underestimated. For those adept in the art of digital sculpting, wielding these tools offers an intuitive approach to vanquishing zero faces. Begin by selecting the troubled object and transitioning to “Sculpt Mode.” Engage the “Fill” tool, gently guiding it over the afflicted areas. As the tool weaves its algorithmic magic, faces gracefully emerge, filling the voids that once plagued our mesh.
Unleashing the might of third-party plugins, we supplement our Blender toolkit with specialized extensions designed to combat zero faces. These plugins, meticulously crafted by the Blender community, automate and streamline the process of mesh repair. With a single click, we can summon their assistance, empowering us to resolve topological errors and banish zero faces from our digital creations.
In conclusion, the battle against zero faces in Blender is not without its challenges, but the rewards of victory far outweigh the tribulations. Through a comprehensive understanding of mesh topology, a judicious application of modifiers, and the mastery of sculpting techniques, we ascend as digital architects, capable of constructing 3D marvels unbound by the constraints of invisible geometry. Remember, every masterpiece is a testament to our unwavering determination and the triumph over adversity.

Image: blender.stackexchange.com
How To Fix Zero Faces In Blender
https://youtube.com/watch?v=LbXFXvcRY7c